Happy Birthday Mom!

Happy, Happy Birthday Mom! Thank you for everything you do!

Here is the present:


IMG_1304
I made the pillow cover and tied a pretty bow with ribbon!

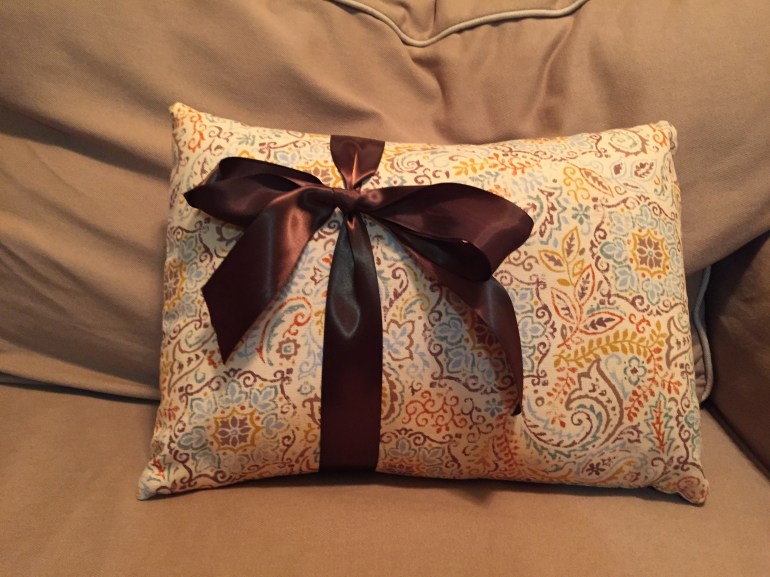
The present has an interesting story:

About a week before my moms birthday I happened to be going to Walmart to get some grocery’s (or something) While I was there I decided to check out their fabric to see if they had any fabric that would inspire me to make something for my mom. At the time I had 1 idea of what to make my mom and it wasn’t very good. So I was open to any possibilities. When I came into the fabric section I saw it, my moms favorite fabric! (she has a whole yard of it somewhere)  I couldn’t believe my eyes! It was then that I knew exactly what to make, a really cute pillow cover with this gorgeous fabric!

So I got a zipper, pillow form, and the fabric. (Walmart actually has really cheep, but nice pillow forms) When I started making it I was going to put the zipper in the middle of the back of the pillow, but the zipper was too short! Of course after I had already sewn it in. So I grabbed the rest of my fabric (I bought too much, thankfully it turned out that I had bought just the right amount!) And made a zipper-less pillow holder. It still turned out great!


Fairy Light Jar!

Originally posted on kelleysdiy

I really loved this idea from the start, so I decided that it would be fun to try!

Here are my daytime pictures:

And the nighttime pictures:

This was such a fun project to make! I just love my sweet nightlight!

Just an Update

So, for the new site, it is coming along nicely! I have a few projects up. I said that it would be ready by the end of June. It will be ready! Just not completed, think of a cake, you could eat the cake without frosting but frosting on it would be better. Right?

At the end of June all of the pages and projects will be available, most will have pictures, but a few won’t yet, there won’t be pictures on the “Lets Gets Started!” page yet. I just want everyone to know that they are coming! They will be there!

The first week of July will also be exciting because I will be able to do my regular tutorials then. I may also update a few! I am looking forward to next month and all of the potential it has in it! Have a great summer!


Stichy Paper Designs

I am SOOO excited for today’s project! These are one of my favorite things to make! I like to put them in frames and make them into cards! Don’t just stick to the shapes that I included, try words! A ‘Thank You’ or a ‘Happy Birthday’ could looks super cool! Be Creative!

Skill Level: 1 With a little sewing machine experience. (Psst: This is a GREAT practice project!!!!!)
Time to complete: Depends on design you choose. Around 10 minutes each.

You will need:

Basic Sewing Supplies

A fun color of thread

Printer (for printing out designs)

Cardstock (I like a natural brown but any color you choose will be totally awesome!!)

Scissors (paper)

Pencil

Lets Make IT!!!!

  1. Print out these Design Shapes. Remember, don’t limit yourself to just shapes, words, symbols, or even something you draw will be super cool. Cut out your design and trace it (with the pencil) to the cardstock.IMG_1277
  2. Thread your machine with a fun color of thread.
  3. Sew carefully around the shape. You don’t have to backstitch!IMG_1278
  4. Trim your threads and you are finished!
  5. You can put your design in a frame, give it as a card, or do whatever you want with it!! Great Job!IMG_1279

How to store Sewing Patterns

For the past few days I have been wondering what on earth I should do with all of my patterns! I had all of these little scraps and pieces of patterns everywhere.

First lets look at tracing patterns:

  • I like to trace my patterns onto parchment paper, it is easy to see the lines through!
  • When you trace your patterns do it carefully! It is easy to make a simple mistake like tracing the hem line instead of the actual cutting line.
  • Take your time when cutting the patterns as well!

Next lets take a look at storing our patterns:

  • Find a cheep spiral bound notebook with lines in it (available at Walmart or any office supply store. Also known as “1 subject notebooks”)
  • You may want to glue together 2-3 pieces of notebook paper (leave it in the notebook!!) so that you have 1 thick page. This prevents ripping!
  • Find and label some large envelopes. You can label them for individual projects, or you can label them for pattern sizes.
  • Finally glue in the envelopes to the thick pages in the notebooks!

I find it a ton easier when you can easily find your patterns! Enjoy!!

Happy Memorial Day!

Today we remember all of those who have given their lives for our country. Those who bravely fought, till death. Every man, or woman that has given their lives for us, deserve to be praised. Let us honor them, by making America the best place it can be! Happy Memorial Day!

Dried Roses

I promised awhile ago that I would do a how-to-dry roses tutorial when the roses came. Well now they are here. I also did this because Dried Lilac flowers has been the most successful post that I have written.

Happy Summer!!!!

Hello everyone! Today was/is my last day of school! Here is an end-of-year project that I finished, this assignment was for Reading, Writing, and Spelling.

Paris by Hannah Snoke

A giant summer project!

Hello everyone! I am very excited to share this big news with you! This summer I am making a huge project! I am making a DIY fashion design website where you will be able to easily find tutorials about making your own clothes, accessories and fashion! This project will not be finished until late July of this year! Please check for updates!**

Delicious Chocolates!

Hello everyone! Welcome to craftsofallseasons’ first ever recipe! These chocolates are sooo good! You will love them, and they are made in an ice-cup tray so you can make any shape you have an ice-cup tray for! How fun is that?

You will need:

Something to melt the chocolate in, (I recommend a Wilton candy-melts machine, if you don’t have one then you can use a microwave or a double broiler. A note about the Wilton candy-melts machine is that it has a “keep warm” feature which is VERY helpful for this recipe. It also has a pouring spout so that it is very easy to transfer the chocolate to the molds)

3/4 cup of semisweet chocolate chips

3/4 cup of dark chocolate chips

Note: You can do all semisweet chocolate if you want

Ice-cup tray (any shape that you like!)

Cooking spray (for spraying the molds)

Note these chocolates make perfect gifts

Lets make it!

Note: The directions for melting chocolate are for the Wilton candy-melts machine, if you have a different melting method then instructions will vary.

  1. Grease the molds with the cooking spray. Turn your machine on to 2, pour in the chocolate chips. Stir the chocolate every few minutes until it starts to melt. Stir nearly constantly, if the chocolate seems to be taking a long time to melt then add a teaspoon of oil or a tablespoon of milk. Stir until chocolate is a smooth consistency.IMG_3682IMG_3683IMG_3684
  2. Now you are ready to start filling the molds! Turn your candy melts machine to 1/ keep warm. (if it starts to harden then turn it back up to 2)
  3. Fill the chocolate just up to the top. Let set until hardened, or stick in the freezer for 15 minutes.
    IMG_3689
    I like to use a spoon to fill my molds
    IMG_3692
    Take your time, this is a fairly easy thing to do. It just takes practice
    IMG_3694
    Don’t worry about your chocolates being perfect, just do the best you can

    Once your chocolates have hardened then break away those edges that don’t look so good 😊

  4. Eat them or if you want to gift them you can put them into a bag and give away! What a nice gift that would be!

If you tried this recipe then PLEASE! comment,  😊 if I get enough comments (say 5) I will make a recipe page! (this page will have easy-to-follow recipes with a picture of the finished project!)