Birthday Party Décor!

Hello everyone! Welcome to another weekly crafts post! Today I decided to make some birthday décor since tomorrow is my birthday! (my party is on Saturday, I will show you pictures soon after that!)

Here is the first craft!
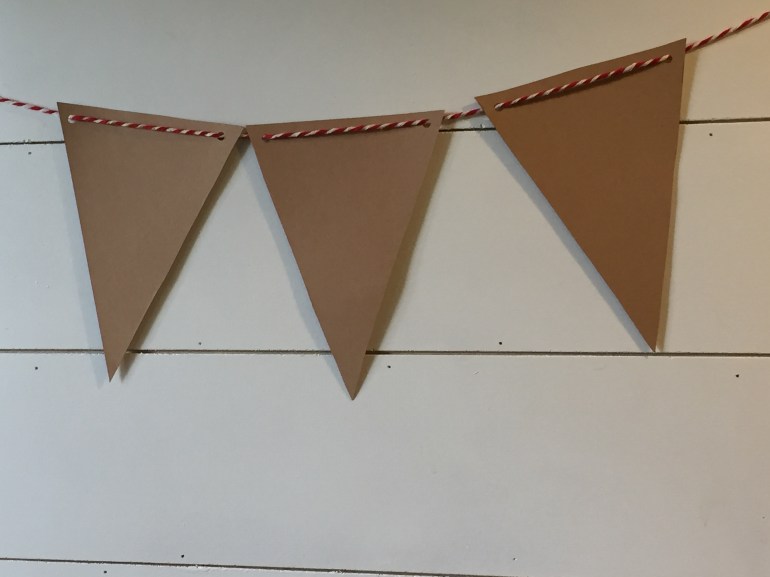
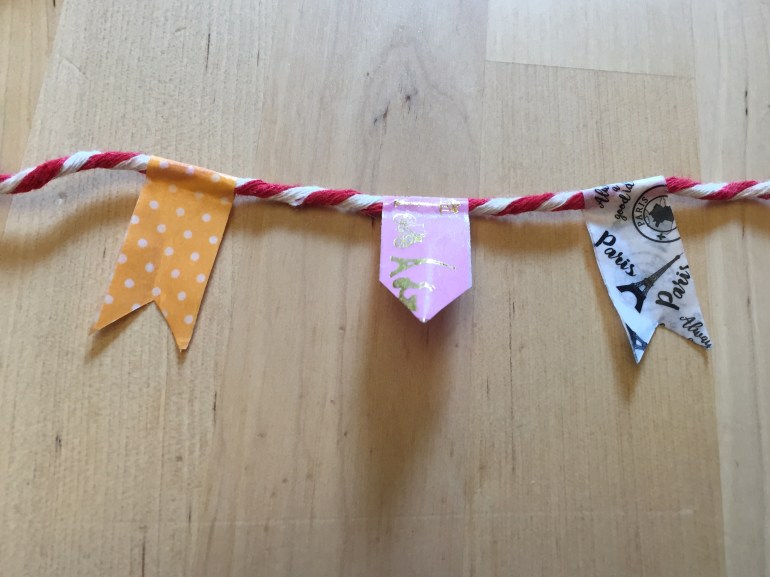
Pretty Banner!

You will need:
  • Pretty Cardstock
  • Hole punch
  • String (for hanging)
Lets make it!
  1. Print out this,  cut it out.IMG_2327
  2. Hole punch each side of the widest side of the pennantIMG_2328
  3. String the string through the holes and you are finished!
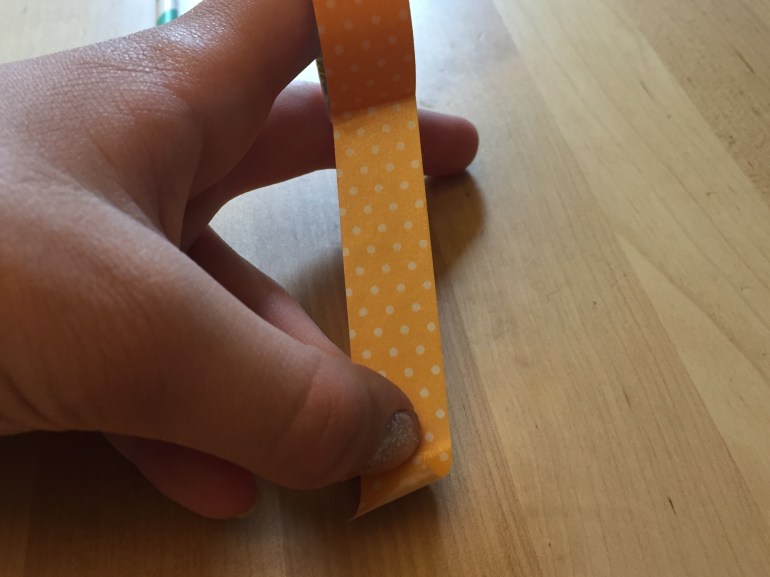
IMG_2329


Cupcake toppers

This is such an easy and inexpensive way to make cupcake toppers!

You will need:
  • A selection of craft/washi tape
  • Skewers
  • Scissors
Lets make it!
  1. Break the skewers into thirds. Trim the scraggly ends!
  2. Peel and tear a piece of  tape.
  3. Place a skewer on the table and stick the piece of tape to it. (center the skewer)IMG_2270
  4. Fold the piece of tape over, trim and you are finished!

IMG_2272

IMG_2273


Table Center-piece!

I love this easy idea of making a center-piece for the party table!

  1. Pick or buy some pretty flowers! If you pick them make sure that you have enough stem so that you can put them in a vase easily!
  2. Put the flowers in the vase. Set in the center of the table!
  3. I used some of these at each corner of the vase! It looked very pretty!
  4. For my candle holders I actually put a flower in each one (not with any water and I used outdoor mod-podge on them)
  5. You have to wait until Saturday for a picture! Sorry, 😦


 Birthday Cake Banner!

This banner is So easy to make! I just love it!

You will need:
  • 2 paper straws in any color you like
  • Washi/craft tape
  • String (I used Baker’s twine)
  • Scissors
Let’s make it!
  1. Cut a 12 inch piece of string and tie one end to the top of a straw.IMG_2258
  2. Tie the other end of the string to the other straw.IMG_2259
  3. Cut a piece of tapeIMG_2260

4. Stick the tape to the table, centered on the string.IMG_2261

5. Fold overIMG_2262

6. Trim and repeat for the other pieces.

IMG_2263

7. I added an extra strand to mine! IMG_2264

And here is my finished banner!

IMG_2265


Paper Straw banner!

This is such a cute banner! I just can’t resist it!

You will need:
  • Paper Straws (found at a craft store)
  • Scissors
  • String (such as Baker’s Twine)
Let’s make it!
  1. Cut 1 straw in half. Cut a 32″ piece of string.
  2. Thread 2 full size straws onto the string.
  3. Thread on the short half straw that you cut in step 1.
  4. Form the 2 long straws to make a point and the short on the top! IMG_2323
  5. Tie a knot at one corner to secure!
  6. Now you are finished! Look how awesome it looks!

IMG_2326


I hoped you liked making crafts with me!

Grace’s Birthday Photostory!

Hello everyone! Today is Grace’s 2nd 12th Birthday!

Happy Birthday Grace!

Liebster Award

I want to say a HUGE THANKS to Enni from Hooves and Pens! You should definitely check out her blog! She posts about the most amazing things!

Liebster Award

Here are 10 random facts about me:

  1. I LOVE volunteering and helping little kids!
  2. I really dislike Spinach
  3. I live in a small town and love it!
  4. I am taking French
  5. I am going into 7th grade and I can’t believe it!
  6. I started this blog for school and look where it has taken me!
  7. I like writing stories but never finish them!
  8. I love reading AG books
  9. I use my dad’s old I-phone to take pics! (at least till I get my own camera)
  10. I am a shy around new people until I get to know them!

The rules:

  • Thank the person who nominated you and provide a link to their blog. (try to include a little promotion for them)
  • Display this award on your blog (by including it in your award post and in your widgets section)
  • Provide 10 random facts about yourself (optional but highly recommended)
  • Nominate 5-11 blogs who you feel deserve this nomination and who have less then 200 followers!
  • Post “The Rules” on your blog
  • Link your nominees and inform then!

Here are my nominees:

Thanks again!

Garden Fun!

Welcome to this week’s photography post! Here are some pics that I took of our garden!

New Post Schedule

Yes! I know what you are thinking: “She just made her schedule last week! She’s updating it already!”

The reason why is because I have been getting some tags and awards and needed a place for them in my schedule!

Here is the “New” Schedule!

Sunday: I usually don’t post on this day

Monday: Weekly Craft

Tuesday: Optional Recipe

Wednesday: Photography Post

Thursday: Optional American Girl Post

Friday: Random post or tag (if their is one to do)

Saturday: Another optional craft idea


Above are some pics I took of Grace! I hope you like them!

Watercolor Seashells

Welcome to this week’s weekly craft! I know many of my lovely readers have been to the beach this summer, and you may want something to do with all of those pretty shells just sitting around!

Skill level: 1

You will need:

  • Seashells (preferably the white ones)
  • Mod-Podge
  • Watercolor paints (I just used cheap ones from Walmart)
  • Paintbrush
  • Foam brush

Lets make it!

  1. Wash and dry your seashells to remove any sand or dirt, if you don’t like the smell of your seashells then after washing them drop them into a bucket filled with bleach. Wash and dry them again after wards
  2. Set up a nice workspace and begin to paint the shells


3.  Let the shells dry completely.

4. After the shells are dry paint the top of them with Mod- Podge


IMG_2218
You will need to rinse out the brush after painting each shell, because the shells still have paint on them that could rub off.

5. Once the shells are dry from their first coat paint them again with Mod-Podge. Paint the entire shell, not just the top. Let dry.

Here are some pics of my finished painted shells!


IMG_2219
Shells drying


IMG_2220
How lovely is that?


IMG_2221
Oooo! I just love the color!


IMG_2222
Hmmm, I love how that looks like a sandy beach with lovely water!


IMG_2223
This one looks like it belongs in a fairy garden!


IMG_2224
I love how this reminds me of a huge mountain!

I hope you enjoyed! You could paint on some outdoor Mod-Podge and use these in your garden!

Comment questions:
  • Which was your favorite finished Seashell?
  • Do you have any shells just sitting around?


Hoping for 100 followers by Christmas!

Another random, post!

So I have a goal! I want to try to get 100 followers by Christmas! Yes it is a HUGE goal, and I will need YOUR HELP TO DO IT!!!!!!!!!

So TELL THE WORLD! Once I get 100 followers I will be doing a big GIVEAWAY! (this one I will make easier to enter)

Before Christmas, After Christmas, or Christmas day— Whenever I have 100 followers the giveaway will start!

Thank you in advance for your support!

Just wanted to let you know…….

Hello everyone! I just wanted to let you know that I will be gone tomorrow, I have a scheduled post, remember to like follow and comment! I will be with you Sunday!

My Cousins’ blog!

Hello everyone! Today I wanted to introduce you to my cousin Christy’s blog! (I think I should call this week “cousins week”)

Right now she is doing mission work in Belize and starting a school there for children!

Please check out her blog!

The Black Orchid Montessorian

Thank You! Happy Friday


Also, I am thinking about creating an award! It would be something like:

  1. The crafty blog award
  2. The craftily awesome blog award
  3. The creative and fun blog award

Which one do you like best?? Tell me in the comments

Samantha’s School Set

Hello everyone!

To understand about this you need to know the story:

A few years ago my older cousins Sarah and Stephanie gave my sister and I American Girl Dolls. I got Samantha, and my sister got Caroline. I still have Samantha and my sister still has Caroline. (I will show you a pic of Samantha next week)

So anyway, my Grandma found a small what looked like a mini old-fashioned school set in her one of her bedrooms where cousins, and other family can stay when they are traveling or visiting.

It turned out to be that Sarah had forgot to give me that school set for my doll Samantha.

Interesting story right?!

This school set is from before Samantha was retired so it is very special to me!

I wanted to show it to you:

IMG_2161
Isn’t it just so cute!

Here is a gallery of all of the items in the set!