

Hey guys! I’m sure you’ve seen those gorgeous gallery collage walls all over! They’re the perfect way to add some style and fun to a boring spot in your room! Photo collage or gallery walls look super easy to do, right? But personally, I’ve always been confused about what to use to hang them, how to layer, etc. After doing some research and trial & error, I think I’ve found the best, most inexpensive way to DIY a super aesthetic photo collage gallery wall!

Step 1: Assemble your photos/pictures. Decide what photos you’d like to use for your gallery wall. You can use photos you’ve taken, photos from Pinterest, art, or gifts from pen-pals and friends! If you’re going to be using a lot of photos, I’d recommend putting a filter on them, or making them all black and white to keep it cohesive and flowing well. Also, if you can, I’d decide on a color scheme/feel for your collage. This can be super helpful when you actually start putting it together.
Once you’ve found the photos you want to use, go ahead and print them out. I just printed them out on my family’s laser printer on regular white paper. You could use photo paper or cardstock if you’d like, but I’ve found that printing on regular paper works fine. Also, don’t be afraid to print out different sizes/shapes of your photos.

Step 2: Start hanging your largest photos. You’re going to want to start by hanging your largest photos (or art, mementos, etc.) first. This will provide a nice background for filling in the gaps with your medium photos, then small photos.
As for actually hanging the photos, you can use whatever you’d like, but I’m using basic masking tape and wall putty. I’ve tried using washi tape before, but the photos fell off quickly. I’ve also tried just basic wall-safe tape and they also didn’t stick and they peeled some of the paint off my wall. So, I’m really hoping that my masking tape and wall putty combination works! Note: It did work!
Step 3: Start layering in some medium photos. Once you’ve hung the majority of your larger photos, go ahead and start layering in some medium ones. Here you can start to get the shape of your collage a little bit better.

Step 4: Add in your smaller photos to fill any gaps. Finish the collage by adding in some of your smaller photos or I actually love using ATC’s for this part too! This is a great time to add in any more photos that you really want to use for your collage, as they’ll be toward the front and more visible! I also stuck some vinyl stickers to mine to keep it in place a little better.
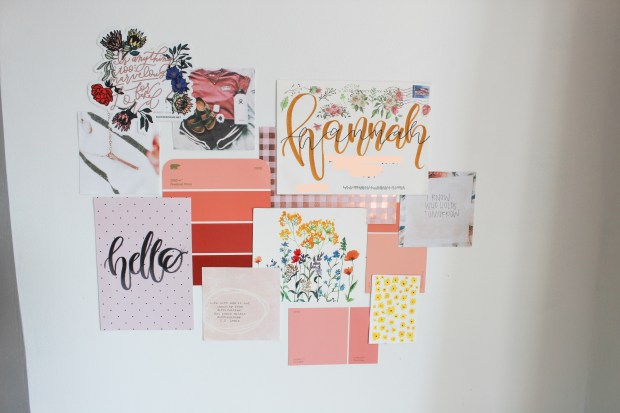
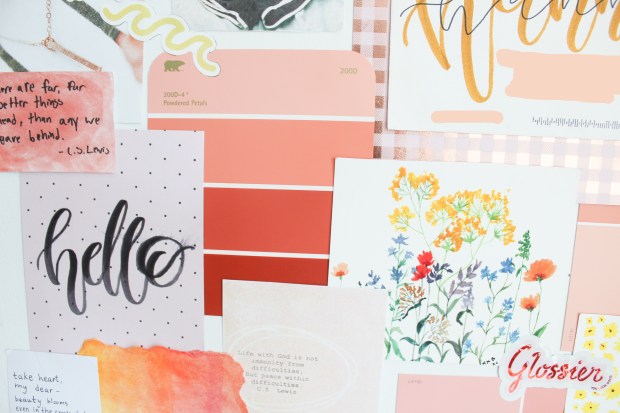
Here are some more photos of the finished collage:


Alright! I think that’s pretty much it for making an aesthetic photo collage! I hope you guys enjoyed!

Sooo pretty, Hannah! I recently made a wall collage for my studio and I love how it turned out. They’re such fun decorations that you can easily change up when you want! 🙂
LikeLiked by 5 people
Aww, thanks, Allison! Ooh, yes, I saw yours – it’s super cute! 🙂
LikeLiked by 1 person
This is stunning! I want to do this for my dorm next semester, and I’m super excited!!
LikeLiked by 2 people
Aww, thanks! Ooh, you totally should! 👍
LikeLiked by 1 person
Aw this is super cute!
LikeLiked by 1 person
Thank youuu! ❤
LikeLike
💐
LikeLike
Perfect timing! I’ve been thinking about doing one of these for a while, but didn’t know how to do it right. Yours looks beautiful!
LikeLiked by 1 person
Yay! You totally should, it’s super easy with the masking tape! 😉
LikeLiked by 1 person
I loved reading this. I’ve actually been contemplating making a gallery section for part of my wall so this has been the sign I have needed! meg xx
whatmegmeans.wordpress.com
LikeLiked by 1 person
Aww, thanks, Meg! Ooh, I’d love to see if you do! 🙂
LikeLiked by 1 person
aw this turned out so cute!
LikeLiked by 1 person
Thanks, Christina! 🙂
LikeLiked by 1 person
Super pretty! I love the colors 😍
LikeLiked by 1 person
Aww, thanks, Hope! ❤
LikeLiked by 1 person
This is really pretty!!
Where do you get the paint swatches?
LikeLiked by 1 person
Thank you so much! I got mine at Lowes 🙂
LikeLiked by 1 person
Thank you! 🙂
LikeLiked by 1 person
The cutest!!! I’ve always wanted to do one of those!
LikeLiked by 1 person
Aww, thanks, Cassia! Ooh, you totally should!
LikeLiked by 1 person
This is so pretty 😍 i should try one myself hahaha 😂❤️
LikeLiked by 1 person
Thank youuuu! ❤ Ooh, yes you definitely should! 😉
LikeLiked by 1 person
Girllll dats so cute❤️❤️❤️
LikeLiked by 1 person
Aww, thanks! 🙈
LikeLiked by 1 person
Ahhhh!! That is so beautiful! I looove it! Wonderful post! ❤
-Laura ❤ 🙂
LikeLike
This is sooo CUTE!! Ahh awesome post!
LikeLike
This look so pretty! I don’t know if I’m creative enough to do it as good as you😂 definitely gonna try though!
LikeLike
Wow! So pretty!! I might have to try this!
-Haley
LikeLike
Oooh I love that!! Super pretty!!!! 😀
God bless! 💖
-Hope
LikeLike
Love how yours turned out 😍 this was so helpful! I’ve been wanting to do a gallery wall for a while and just didn’t know where to start.
LikeLiked by 1 person