

Hey guys! I’ve been getting a lot of questions on how I edit my photos, what programs I use/recommend, etc. Today I wanted to share how I edit my photos using Lightroom CC. I’ll be giving different examples of different editing techniques you can use based on what photograph you want to edit, as well as the lowdown on the basics of Lightroom.
If you want an entire list of differences and a whole post on this click here.
The new Lightroom CC is pretty much different than any other Adobe products, but it’s a great photo editor and it was super easy for me to figure out.
I’m doing a tutorial on the new Lightroom CC today. 🙂
Once you downloaded it (easy directions along with pricing can be found on the Adobe website) open it up and your view will be similar to this. (I’ve already been using it for a while so the picture I was last working on just pops up)

There are several options for uploading photos. You can either browse your current uploads or you can connect your camera/phone and upload directly from there, without having to save the photos to the computer first. (I prefer just uploading them to Lightroom, editing them, then saving to my computer)

Once you’ve selected your photo/s (I only selected one, but you can select many at a time) this will be your view.

You can sort your photos into albums and see past uploads.

Now to begin editing your photo. Go to the tools bar and select the top option, you will see options for editing Light, Color, Effects, Detail, Optics, Geometry, and an option for Presets.

On the next option down you will see the crop tool.

There is also the brush tool. (I’ll be going more in detail to that later)
Note: There are also 3 other tools, but they are pretty much self explanatory, and I didn’t want this to get too lengthy.

Once you’ve finished editing your photo there are several options for saving/sharing your photo. Click the “share” button to save the photo to your desktop or to share to the web.

You can also save it to your cloud, which seamlessly connects through your other devices which is is super nice.

And that completes the basic lowdown on Lightroom CC.
Next I’ll be going into more detail about how I personally edit my different styles of photos.
Portrait:

For a portrait, I don’t really do much other than brighten things up. I do a lot of creative edits (more details later on) on portraits, but if I’m keeping it natural then I usually just up the Exposure and Contrast a little. I’ll also up the Vibrance if the photo could use some more color, or if it’s a little dull.

Styled:

I typically style my photos for product photography, so sometimes they are in weird places that don’t have the greatest lighting, in that case, it will take me a while to edit them. I just kept this example simple though. The lighting was already natural, but it could definitely use some brightening and more color contrast. I just upped the Exposure and Contrast, toned down the Highlights and upped the Vibrance and Saturation slightly.

Candid:

Candid’s have always been tricky for me because the people are always moving. XD I did capture this awesome moment of my Grandpa blowing out candles on his cake, but I wanted to change a few things about it. For one, I wanted to make my Grandma’s face more vibrant, instead of disappearing into the background. I also wanted to tone out the people in the background of the photo so it wasn’t as distracting.
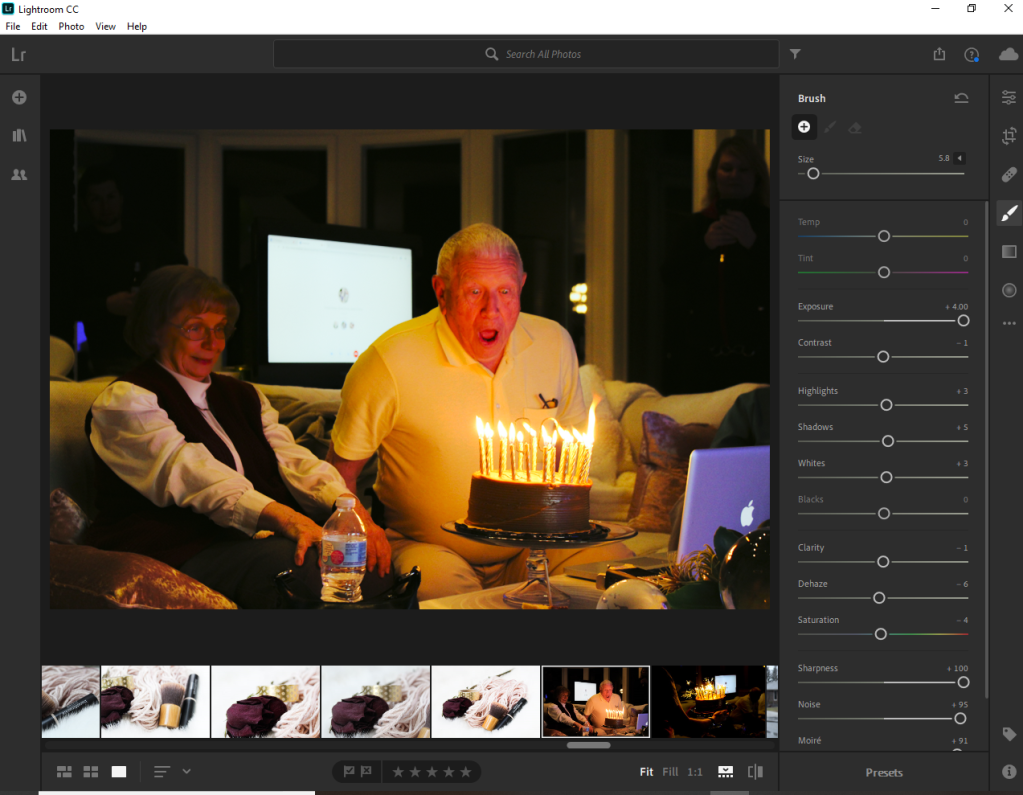
First I used the brush tool to brighten her face by upping the Exposure. The brush tool allows you to select a certain area to edit, rather than editing the entire photo.

To achieve this I upped the Contrast a little and toned down the Shadows to get the other people mostly out of the background. Notice I didn’t touch the Exposure. I only did that with the brush tool on the face.
Selfie:

I usually don’t do much to selfie’s since I think they look best either very natural or edited creatively. Since I was already doing a creative edit in a minute I wanted to just keep this one very natural looking. I did a few minor touches on it though, it’s not super noticeable in the comparison, but I do think the second one looks better.

Nature:

Another one I don’t typically edit a bunch is nature photography. For this one of the lighting was already great so I just upped the Highlights, Vibrance and Saturation slightly to get a more bright photo.

Golden Hour:

Golden hour is my favorite lighting to shoot in, just because there are so many different editing techniques you can do to the photos, and they typically always turn out great. (unless it’s too dark)
I do typically edit the photos I take during golden hour, just because I either 1) Want them to look uniform with each other or 2) Want to make them look more interesting or 3) Want to get really creative with it.
For this one I just kept it (mostly) natural looking, although I did use a preset on it. First I upped the Contrast and Highlights, and also the Vibrance and Saturation. I did also up the Exposure slightly.

Then I upped the Grain a little bit and also the Sharpening.

I wanted to take it a little step further so I went to Presets, Curve, and selected Flat.

Filter: (creative edit)

This is for a photo that everyone knows is edited, but looks really cool anyway. I love doing these when I’m bored or if I’m making an aesthetic.
First and foremost I upped the Contrast quite a bit.

Then I upped the Clarity, Dehazed it, upped the Grain and Noise Reduction.
I also used the brush tool to brighten the eyes a little more.

I really love how this one turned out. I can’t wait to show you guys the new aesthetics I’m making using creative edits on photos. 😀
I hope this was helpful and maybe answered some of your questions.
On another note by making this post I’m not saying that you need to edit your photos to make them look good. For most of the photos I take I don’t edit them much if at all. I do think that photos can be improved by editing though, especially ones taken at golden hour. (mine always seem to end up too bright or too dark until I edit them)
What photo editing program to you use? Do you edit your photos?
-Hannah
P.S. Would you like to see the rest of those sunset photos I took?

Sunset pictureeeeeeees. I hardly ever use Lightroom. Or editing. Not sure why. *shrug emoji* Ah well. Still, great tutorial- me thinks me might need it in the future. 😀
LikeLiked by 1 person
Thank you! Yeah, I think a lot of people do a bunch of different things when it comes to editing! 🙂
LikeLike
Very cool! How expensive is it? Do you have to pay monthly, or all at once? Thank you!
LikeLiked by 2 people
Thank you! It’s about $10 per month for Lightroom CC, Lightroom Classic and Photoshop.
LikeLiked by 1 person
Okay, thanks!
LikeLiked by 1 person
Very cool, thanks for sharing! ❤
LikeLiked by 1 person
Thank you – sure! 🙂
LikeLiked by 1 person
You’re welcome!
LikeLike
My mom uses Lightroom 🙂 I usually use Photoshop (if I’m editing it for a graphic design) or VSCO (if I’m editing just a regular picture). Maybe I’ll start using Lightroom, though 🙂 x
LikeLiked by 1 person
Yeah, I love using Photoshop for graphic design, then I usually use Lightroom to edit.
LikeLiked by 1 person
Ahhh, nice, Hannah! I use Lightroom Classic and have nearly no idea how to use CC. XD If you ever need help with Classic, I’d be glad to help! Great tutorial, though! I
LikeLiked by 1 person
Thank you, Aria! Hehe, yeah, the CC wasn’t too hard to figure out. Aww, thanks! 🙂
LikeLike
Ooh Lightroom looks so cool! Thanks for the lil tutorial. I use Ribbet (cuz it’s freeee lol!) for editing my photos, but Lightroom looks better quality. How much is it?
LikeLiked by 1 person
Sure! Yeah, Lightroom can be kind of expensive depending on your budget (it’s $10 a month for Lightroom CC, Lightroom Classic and Photoshop) but I would say that it’s the highest quality photo editing software that I’ve ever used.
LikeLiked by 1 person
Okay thanks! Yeah, it’s probably not worth it for someone like me right now. But I’ll keep it in mind just in case!
LikeLiked by 1 person
I use Lightroom Classic! The cool thing about CC from what I can see… is that CC looks like LR Mobile. Idk. Maybe that’s just me?? Great tutorial, Hannah! ❤
LikeLiked by 1 person
Thank you Emma! ❤ I've never used LR Mobile, but that is sort of interesting! 🙂
LikeLiked by 1 person
My sisdter loves photography, I’ll show her this! 💕
LikeLiked by 1 person
Thank you! I hope she’ll enjoy it! 🙂
LikeLiked by 1 person
Great post! Just downloaded the app. I’m going to try it out. 🙂
LikeLiked by 1 person
Thank you! 🙂
LikeLike
I love Lightroom. We have the app on our phone.
LikeLiked by 2 people
Me too! It’s so helpful isn’t it!?
LikeLiked by 1 person
These photos look so nice!!!
LikeLiked by 1 person
Thank you! 🙂
LikeLiked by 1 person
Great post Hannah! I would love to get lightroom, but… It costs money, lol! xD 😛 😉 😀
LikeLiked by 1 person
Thanks, Rosy, haha yeah.
LikeLiked by 1 person
This post was super neat! Lightroom looks super cool! 😀 I would love to see more of your sunset photos! 😀 This was an awesome post! 😀
-Laura ❤ 😉
LikeLiked by 1 person
Thank you Laura! I do really enjoy using it! 🙂
LikeLiked by 1 person
😀
LikeLiked by 1 person
Great tutorial!! I use photoshop mainly. Because it’s what my son showed me first lol. But love seeing a tutorial like this one!! Very informative n interesting. Thanks!!
LikeLiked by 1 person
Thank you so much, I’m glad you enjoyed! 🙂
LikeLike
This was super helpful! How much does it cost to use Lightroom CC?
I loved the pictures!
LikeLiked by 1 person
I’m so glad you enjoyed it! 🙂 Lightroom CC costs about $10 a month.
LikeLike
These are GREAT tips, Hannah! I’ve tried using Lightroom a couple times but got confused and went back to PicMonkey because I feel like you can do basically the same things. XD Lightroom seems like an excellent, professional option, though!
LikeLiked by 1 person
Thank you! I’ve never used PicMonkey before, but it sounds really great. 🙂
LikeLike
Yep, I love it! 🙂
LikeLiked by 1 person